While I think it’s always helpful to hear advice for blogging and “how to be successful,” I do think that there’s some tangible skills that can make your blogging experience more seamless. Today I’m sharing my absolute NUMBER ONE most asked question. Seriously, if I had a dollar for the number of times I was asked about this, I could retire.
“How do you make collages for your blog?”
The short answer is that I use Photoshop. But I’ll walk you through how I do it exactly.
Now, I’ve been using Adobe products since I was 13. I first was introduced to Adobe InDesign in seventh grade when I joined yearbook. Once you know one Adobe product, it makes it easier to learn the others. I was involved with yearbook/journalism through my senior year of high school so by the time I graduated, I had a LOT of experience with InDesign and Photoshop. One of my close friends from high school and I used to swap tips and advice… teaching each other how to do cool things.
This was one of my specialties back in 2006, ha! In college, I even took a digital art class where we learned more about Photoshop and Illustrator, but for the most part
I taught myself how to do a lot.
Even if you have
zero experience with Photoshop, I do think anyone can learn it. If you’re new to the program, don’t splurge on
the entire Creative Suite. If you’re just starting out,
Photoshop Elements will do the trick. You can do just about everything you’ll need to do with Elements. I used it throughout college before upgrading.
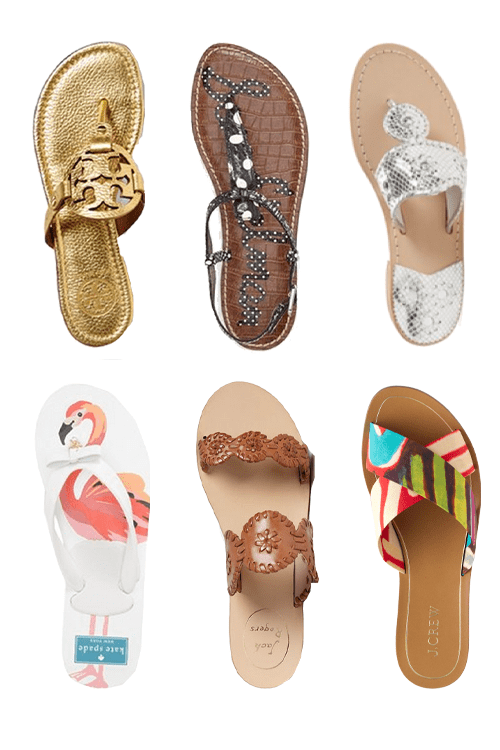
… Now here’s how I do it. Let’s pretend like I’m doing a post on fun sandals for summer and want to do a collage for the blog post.
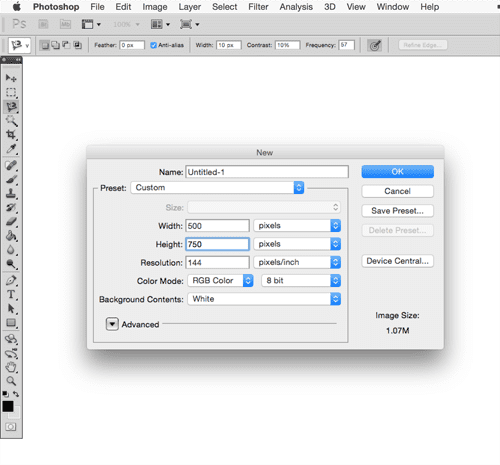
1. Start with a blank document
Everyone will have a different dimension depending on the width of the posts in their blog. My blog post width is 500px and I typically start with a length of 1000px. (I might keep it short, cropped down to 750px. Or long at 1250px depending on the layout and number of products I want to include.)
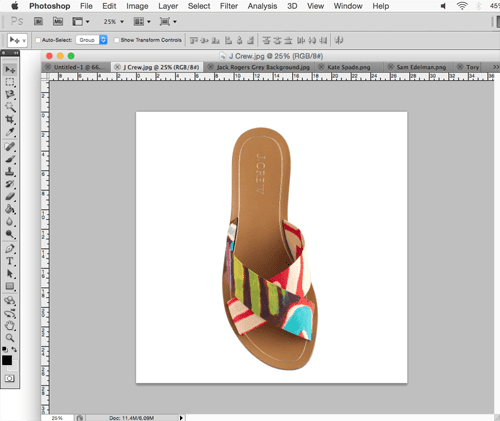
2. Open your images
I always open images separately, so they’re in their own document.
3. Isolate the product (aka get rid of the background)
This is really the biggest thing and probably what gets most people hung up. There are a few ways you can isolate the product. Magic Wand, Polygonal Lasso, or Magnetic Lasso. If you’re lucky, the image is on a white background like
these J. Crew sandals.
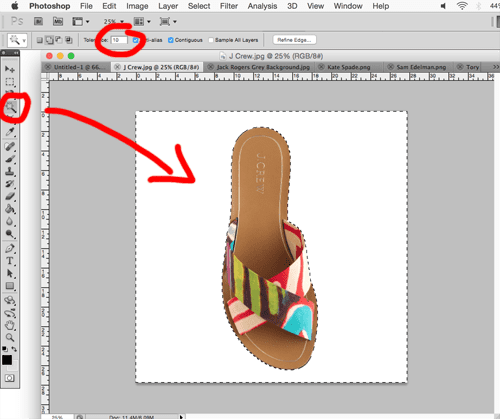
This is super simple and easy. Click on the Magic Wand Tool, set the tolerance to 10, and click on the background. You’ll see the background highlight with a dotted line, and the outline of the product will be highlighted as well! While that’s selected, right click, and choose “select inverse.” This highlights the product only, literally isolating it from the background. Then right click again and choose “layer via copy.” This creates a new layer that is the product only.
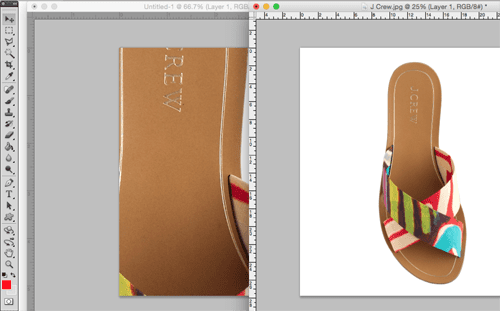
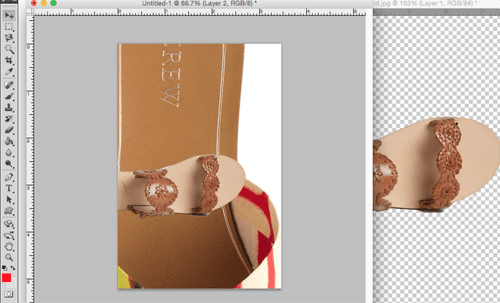
Once you have the product isolated, drag that layer (make sure you’re clicking the layer with just the product) over to your blank document.
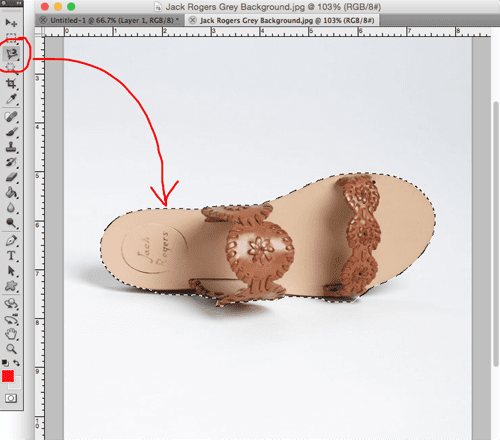
Sometimes there is a background that doesn’t work very well with the Magic Wand Tool. The Magnetic Lasso is great because it “sticks” to the outline of the product way easily!!! Just click on the Magnetic Lasso tool, make one click to start the trail, and just glide your mouse around the product, you shouldn’t need to click… but you can if the trail isn’t sticking to the product (like around a shadow).
When you get back around to your starting point, a tiny open circle will pop up, clicking that will “close” the outline. Then you just right click and layer via copy. Drag that layer over to your blank document as well.
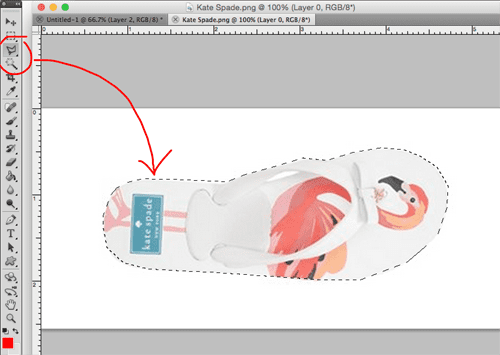
Sometimes the product won’t cooperate with the Magic Wand or the Magnetic Lasso. Then you have to be a little patient and go with the Polygonal Lasso. You basically create points around the product, similar to tracing.
Then it’s the same pattern. Right click, layer via copy, and drag the product to your new document.
4. Rename layers
Once you have all the products in your blank document, rename the layers so you know what you’re working with.
5. Resize the products to be consistent
Resize and rotate layers as necessary! The shortcut (at least on my computer/version) is command+t. This brings the “free transform” up. You can make the product bigger or smaller and even rotate by dragging the corners. Click the shift key while doing this to keep the ratio the same (aka you won’t distort the product).
6. Rearrange and save
Once you get more comfortable with the tools and tricks, you can really do anything. You can add text, add tons of products, come up with cool layouts, whatever your heart desires!!! Save the document and then upload to your blog!
Explaining Photoshop is kind of tricky, but hopefully you feel confident enough now to at least give it a try. No one will be perfect when you start. The best way to learn is to experiment, watch Youtube videos, and just simply play around with it! The more you play, the more you’ll learn. You may even find a better way that works for you, this is just how I’ve been doing it for years!
Any other blog-related things you’d love to learn?







Loved this post! I didn't know the "layer via copy" trick so that was great to learn! Seems to be a bit easier than the way I was doing it through inverse selection! I would love to learn more of your photoshop tricks that you have learned through the years 🙂
Annie // Annie N Belle
Do you use Lightroom at all? I've been looking into it but don't really know where to get started!
You can also isolate images using the pen tool — it makes for much cleaner lines as opposed to using the magic wand or lasso tools
My greatest difficulty is the rearranging part! I guess I gotta just work on my spacial awareness… -Audrey | Brunch at Audrey's
This is really useful and easy to follow, even though I feel I'm pretty experienced with Photoshop there were still things I had overlooked previously that you reminded me of!
http://njcdesigns.blogspot.co.uk/
Love this post! I typically use PowerPoint for my blog images but it annoys me how it kind of messes up the picture once you remove the background!
xoxo,
Katie
chicincarolina.blogspot.com
I use Polyvore (www.polyvore.com). You can pull things from websites with the widget and it allows you to save your works and your clips without taking up space on your computer.
I am beginning to learn Adobe Suites slowly but surely. It's a lot harder than I thought but the little things I do know, I feel pretty confident in! 🙂
Awesome tips! Thank you so much for sharing this! I've been working on making my collages better and this is just what I needed!
Her Heartland Soul
http://herheartlandsoul.com
How do you create/organize your blog schedule? I love that your posts are always interesting & creative as well as very helpful! Thank you ????
OMG….that's so much work! I mean, it probably breezes by for you, but eeeek!! I always envy people's collages and never thought about how much work it takes to get it done. Very admirable!
coffeeslag
COFFEESLAG Deal Of The Day
That seems like so many steps! Now I know how to do it though, thanks for sharing! 🙂
I am bookmarking this post! Thanks for sharing!
Lauren,
http://www.atouchofsoutherngrace.com/
This is so useful! Thanks for making this post!
Roxi – http://www.goldenpolkadots.blogspot.com
I love when bloggers share their tips and secrets, and this is no exception! Thank you, Carly!
Hi Carly,
I was wondering if you would recommend Photoshop Elements to a rising college senior looking to heighten her adobe skills, or if you think it is worth the extra cost to upgrade to the entire Adobe Creative Suite, especially at the student price.
I have base knowledge with Photoshop, and have a better grasp on Illustrator already thanks to an on campus job, but would like to heighten my skills by practicing on my own computer.
Any advice and opinions from other bloggers and fellow media lovers would be great.
Thanks,
Katelyn
https://livingcolorfullyincopenhagen.wordpress.com/
You should look into student discounts for the Adobe Creative Suite! They make it pretty affordable! http://www.adobe.com/education/students/how-to-buy-eligibility.edu.html?
Saving this!! Thanks so much for the nice tutorial!
Hey Carly,
I'm getting stuck on one step. After I've chosen 'layer via copy' and isolating my product image, I'm confused as to how to drag the image over to the blank document? I can't seem to drag mine anywhere. I'm a newbie at Photoshop, so it might be a silly question!
Thanks!
Oh wait! Just figured it out. Yay!
Thanks so much for this post!
I'm trying this for the first time later today! Thanks – I'll let you know how it goes 🙂
This is working great for me, I can't wait to start doing this on my blog! You're really contributing to the aesthetic of my blog!
Nik
http://dimensionsbynik.com
Specific features are almost putting the best possible thoughts which one have to get followed immediately. The different collages giving better opinions which must be tried. web product manager job description
Thanks for this blog! How does this sit in terms of permissions for the images you use? I would like to start a reviews blog that also has a ‘wishlist’, but I’m worried about infringing copyright on product photos.