
If something catches your eye, it can almost always make a great photo for Instagram. It caught your eye after all! I do stage Instagrams, but they’re based on whatever is going on anyway: moving plates closer, lining a few things up on my desk, holding something (like an ice cream cone!) against a backdrop, etc. Sometimes you might see something that looks interesting and you have to change your perspective to get the shot. After the initial inspiration, lighting is the most important. Natural light is 99% of the time going to make for the best photo, but I don’t let it stop me if I really want to snap something– like in a movie theater or a late night snack.
2. Square and crop
I take about 50% of my photos for Instagram already in a square. Sometimes I’m just snapping photos regularly and then crop it down to a square later. Taking a photo in square, if you know it’s for Instagram can help you make sure that everything is aligned and will fit into the final product. Nothing more annoying then getting a cute shot and not being able to get it to fit into a square!
When I crop, I tend to like to center whatever the point of interest is. You can also find the rule of thirds helpful to add interest and elevate the composition. My biggest cropping tip is to not zoom in too close. Yes, you might want a detail shot, but if you’re too close, you lose the context of the photo entirely.
3. Process in Snapseed
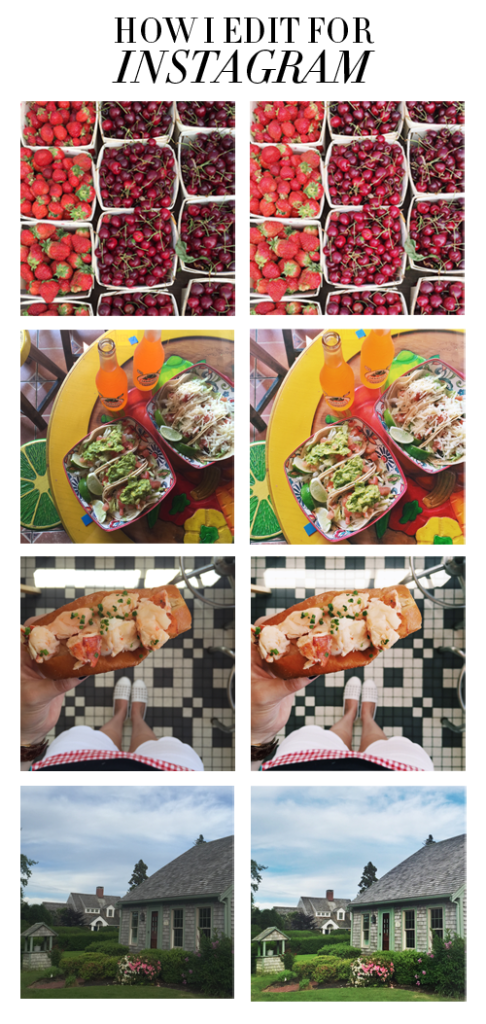
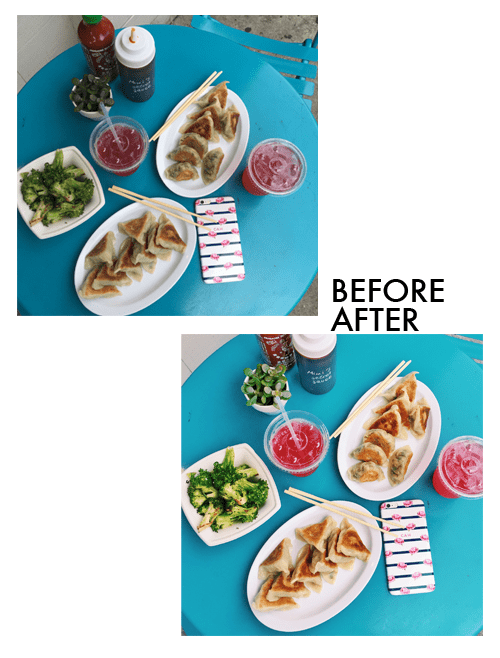
Once I have the image I want to edit, I start by processing the photo in Snapseed. Snapseed is a free editing app from Google and arguably one of the best ones out there. It takes some getting used to, so play around. What you can do to a photo is pretty amazing!
I start by tuning the image– adding brightness, then adding contrast, then maybe bumping out the shadows, and finally a touch of ambiance. Anymore than a touch of ambiance and the photo can go from colorful to downright psychedelic.
Once the image is tuned, I might do some selective adjustments. Adding a touch of contrast can make certain elements of a photo really pop. For example, I added contrast to the macaron in this photo and the granola in this photo to bring out the details.
Then I save a copy of the photo.
4. Process in VSCO
After I do the fine tuning of the photo in Snapseed, I run the photo through a filter (about 90% of the time) in VSCO, another free editing app. I stick to the same C1 filter for all of my photos so they look generally consistent, but I play around with the level of the filter. Sometimes I only use the filter at the lowest level and other times I use the filter more heavily– just depends on the photo.
5. Caption and upload!
After I have the final photo saved, I come up with a caption and upload! I like short captions, a few emojis, and hashtags only if they’re relevant.
PS I want to share more of my processes for blogging… let me know in a comment if there’s something you want me to cover!


Hi, Carly! Thank you so much for sharing this, I'm so into Instagramming lately. Some people I followed back then, they totally have a "theme" for their feed. They look pretty and neat, but too "neat" for me and so polished. Although I'm a blogger but I use Instagram for my life updates. I do the same thing like you, snap and go for it. But still, nice edited photo (vsco rocks! :P) is a must hahaha
Anyway, totally looking forward about your blogging process! Happy weekend!
xoxo,
Jane
http://janefromtheblog.blogspot.com
Thanks for the great tips! They are really helpful. I have been trying to improve my Instagram and I always look to your feed for inspiration.
-Ashley
MyWellDressedLife.com
Thanks so much for sharing this, Carly! I'd never thought of putting my photos through both VSCO and Snapseed. I'll definitely be trying that the next time I post an Instagram!
Tori A. from Prep For A Day
I'm a little embarrassed that I never thought of already shooting in square mode… Duh!!
Thanks Carly! I love seeing how other bloggers edit their pictures! I take my pictures in Square too, it makes things so much easier!
xoxo,
Katie
chicincarolina.blogspot.com
I loved all the tips you shared! I usually do VSCO then Snapseed but I might try switching up the order now that I read this!
xo, Scarlett
The Trendy Chick
Thanks for sharing what you use! I use a fairly similar process, except with Afterlight. I love the lightening functionality on Facetune, too.
Alyssa
http://www.feathersandstripes.com
Instagram: http://www.instagram.com/alyssaloring
These are great tips especially for someone like me who totally clueless about these things.
Navia
http://www.vulnaviajohnson.com
I appreciated the VSCO tip. I didn't know it existed but I just decided to download and play around with it, it's actually pretty easy to use. Thanks so much!
http://aneducationindomestication.com
Great tips! Thanks for sharing! I love VSCO!
Her Heartland Soul
http://herheartlandsoul.com
I love using VSCOcam
xo, Liz
http://lipstickandconfetti.com
Hi Carly,
How do you add captions into your photos that you post on your blog? I really love the way you bring your pictures to life and how they always tie into your post theme.
Thanks!
Riya
Great tips! Your photos are always so vibrant and visually appealing. Thanks for sharing your process.
http://www.livinginsteil.com
Vanessa
I'm a fan of VSCO and Afterlight! I love that tip about using the same filter for your Instagram photos 🙂 -Audrey | Brunch at Audrey's
I love IG filter option… You can easily transform the pics!
awesome!
xx
http://www.manipineiro.com
I adore your blog! Please check out mine at: theprepstergirl.blogspot.com
xoxo
Would love to hear more about your blogging process! Maybe how you plan posts or if you use an editorial calendar, something along those lines.
I love Afterlight as mentioned by some of your other readers and Whitagram. They possess all of the standard photo editing tools seen in Snapseed and VSCO but also allow you to preserve rectangular photos and even panoramic photos so you don't have to crop and compromise your original image.
I read this article http://nymag.com/thecut/2014/04/whats-up-with-these-white-borders-on-instagram.html last year, and I have become obsessed with white space on insta!
https://instagram.com/princessbeth634/
If you're an instagram user you definitely should try AuroraHDR tools for photo editing https://aurorahdr.com/. Since I've tried it once, I cant stop using it for every single photo.