
I was forced to learn how to shoot better photographs at the beginning of the pandemic when my photographer couldn’t come out from the city. It ended up being a “fun” project and looking back, I’m glad I was forced to figure it out because I’m not sure I would have been able to do it without needing a solid push.
Photography, like any hobby, can be a challenge to master. I would consider myself far from a photographer– but I have mastered some simple things that result in better photographs. Definitely good enough “family” photos that are a step up from iPhone shots.
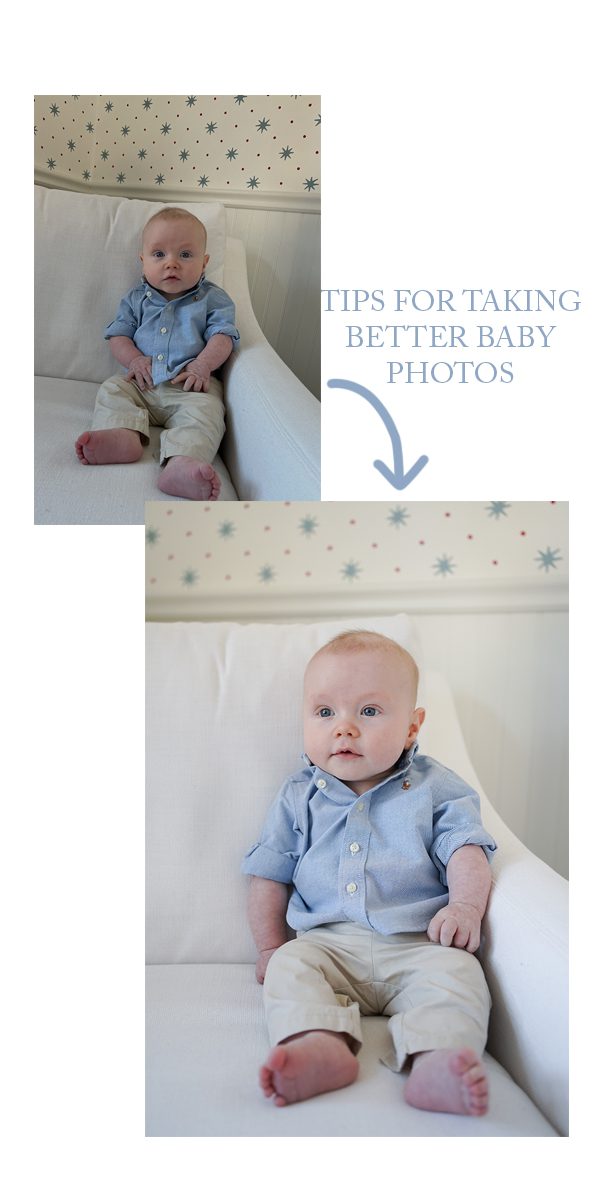
I wanted to share some of my quick and easy tips for taking better baby photos specifically– though the tips could certainly be applied more broadly too. Again, I’m no photographer. If I can do this, you can too.
A COUPLE OF THINGS RIGHT OFF THE BAT:
First, I’d like to offer the advice of considering an online course. If you want to really dive into this, I highly recommend taking a photography course, specifically for photographing children and specifically if you want to use a “real” camera. I took this course that a friend from high school put together. It has been more than a few years since I took it, but I still mentally have found myself referring back to the fundamentals I learned throughout it.
Second, the best camera is the one you have available to you. I think there’s a misconception that you need an expensive DSLR or mirrorless camera to take incredible photos. The reality is that phone cameras have gotten so good that as long as you follow some simple tips, you can take great shots with just your iPhone. (And isn’t having any photo better than not having one because you were waiting for the right gear?) Even Annie Leibovitz agrees.
***
Okay, but let’s say you want to get a real camera or have one already and want to take better photos…. here are my quick tips for beginners. (Again, a disclaimer that I wouldn’t consider myself a photographer, but just a normal person with a desire for better photographs… So I wouldn’t say these are professional tips, but just what works for me!)
GO MIRRORLESS. If you haven’t purchased a camera yet, I would recommend going for a mirrorless camera. These are much lighter than the bulkier DSLRs. I have the Sony a7iii and love it. Of course there are plenty of other options you can go with, but after I did a ton of research, I went for the Sony a7iii specifically because of its eye tracking technology. (Originally I picked it so I could take better photos of myself with my tripod but its been a blessing for a baby on the go!)
PICKING THE RIGHT LENS. Skip the kit lens (that is, a lens that comes with the body of a camera) and instead, purchase the body separately and pick a versatile lens. A kit lens is fine, but will have its limits. A really popular versatile lens is a 50mm, so much so that it’s often called the “nifty fifty.” While I have a 50mm lens, the lens I use the most– especially for everyday shooting– is a 35mm. Again, I did lot of research and chose Sony’s 35mm F1.8 because of its size and capabilities. There are 35mm lenses that have more bandwidth, but I went with one that was light making it easier to carry around. It’s also so much more compact than the bigger 35mm lens that for me it was worth giving up some technical aspects that I may or may not even utilize. I don’t think twice about putting my camera in my diaper bag because it’s not heavy or bulky. A 50mm lens will also require you to stand a bit further back from your subject to get it all in the frame and I like that with the 35mm you can stay super close and get the shot– very similar to taking a photo with an iPhone. (Here’s a good article that does a better job explaining the difference between the 35mm and 50mm lenses and why the 35mm works great for photographing kids.)
NATURAL LIGHT. Whether you’re taking a photograph with your phone or a real camera, natural light is KEY. If you’re just capturing a candid moment, don’t stress about the light and instead get the shot. But if you’re setting up a photograph, make sure you’re taking into account your light source. When I’m inside, I make sure all lights are off and shoot at the brightest part of the day with all blinds/window treatments open.
ZOOM WITH YOUR FEET. Avoid. Zooming. In. Instead, move yourself closer your child. I call this zooming with your feet, ha.
KNOW YOUR CAMERA. You want to both know how to use your camera– every camera is different. Luckily, Youtube 100% will have videos that can walk you through every single button on your camera. Cameras nowadays have so many features, but realistically you’ll probably only use a handful of the buttons and features. Keep practicing until they become second nature so you can make adjustments quickly. Eventually, your most used features and buttons will be set in your muscle memory.
MANUAL MODE. It’s definitely worth learning the basics of photography, particularly the “exposure triangle.” Learning the exposure triangle is what made photography “click” a bit more for me, and at the very least, made me confident that I could get a shot I was happy with. Very basically, you have the shutter speed (how quickly the shutter opens and closes), iso (the brightness), and aperture (the depth of field). All three work together and when you adjust one, the other two are affected. This can be very confusing, but honestly the more you shoot, the quicker the calculations will come to you.
The things I think about when choosing my settings:
– Keep the ISO as low as possible. Assuming you have good natural light, the lower the ISO, the better. (Higher ISO will help you capture a shot when you don’t have good natural light, but the photo will be significantly “noisier.”) Your image may look okay on your camera’s display, but when you upload them to your computer you may not be happy with the graininess if the ISO was too high.
– f/2.8. 2.8 is my “sweet spot” for aperture when I’m shooting one person. A weird rule of thumb I use though is to “double” the aperture for the number of people in the frame. If I was photographing two siblings, for example, I would make the f-stop 4. Three kids? ~6, etc. But 2.8 is my default.
– Fast shutter speed. Because babies and kids are on the move, I try to get the fastest shutter speed possible without losing out on quality.
QUICK EDITING TIPS.
If you’re using a real camera, I would recommend familiarizing yourself with Lightroom and Lightroom Mobile. I use both to edit photos from my real camera. Otherwise, I use VSCO because of its ease of use for editing iPhone photos.
– Don’t use presets. Maybe a controversial opinion in 2021, but I don’t think presets are worth your money. The before and afters you see all over Instagram? They’re specifically chosen to make the after look the BEST. But the reality is that most presets won’t work with most photos you take. Instead, you can create your own preset that fits your preferences and styles. I typically edit one photo and then copy and paste the settings on other photos taken that same day. Between days (or even just locations), it’s worth redoing the edits from scratch to ensure the editing is exactly how you like it.
– Make small adjustments. The fewer the adjustments you have to make, the more realistic and natural photos will look. I typically touch on exposure, contrast, white balance, and sharpening. I don’t tweak much else. I also think the fewer adjustments you make, the less you’ll regret the editing down the line. Something may be a trendy aesthetic now, but then it eventually won’t be. I know I regret how I edited photos on Instagram back in the day…
– Straighten photos. This is such a low-hanging fruit edit. Straightening photos makes a huge difference in appearance. You’d be surprised at how much more professional a photo looks simply by making sure the horizon is straight.
BABY/KID SPECIFIC TIPS:
– Shoot when they’re happy. Don’t even bother trying to get good photographs during a period of the day when your baby/kid isn’t going to be in a good mood. I try to only do planned photos when Jack is well-rested and well-fed. But not too close to a feeding and not too close after a nap so he has some time to perk up. You know your kid! I also never force it. His moods are much more predictable now as a baby than I’m sure they will be as he gets older. But if he’s not having a good time, I don’t force it.
– Choose the right size clothing. Kind of a random one, but how clothing fits/looks can make or break a photo. If a baby is swimming in an outfit, it’s distracting. I like choosing simple colors for aesthetics, comfortable styles that Jack enjoys wearing, and the proper size so as not to distract. When in doubt, choose something simple and basic. A plain white onesie is the sweetest thing a baby can wear, in my opinion!
– Get your settings right before you “begin.” Use something else, like a stuffed animal or your partner, as a test subject so you can hone in on your camera settings. Especially if you’re still learning, it helps to get the settings right before you start the official shoot. I try to spend no more the 90 seconds getting the shot so it doesn’t feel like work for me or the baby. Don’t waste precious moments of good attitudes trying to fix your shutter speed…. everyone is happier when it’s done ahead of time.
SHOP THE POST


Great tips and advice here!! Thank you for sharing!! http://www.elspethsdaybyday.com
These are great tips! Also don’t stress too much about whether they’re facing the camera. Sometimes a candid shot, jumping or running or if they’re looking at someone can be even sweeter. And even easier – lay them down and shoot from above!! Great for baby and toddler sibling photos
INCREDIBLY helpful! Saving for future reference! Thanks so much for sharing.
Great post! Thanks for all advice!
Some of our favorite family pictures were taken with an iPhone and a tripod in the comfort of our home. Thank you for sharing your knowledge – this has been one of my favorite posts to date!
Love these tips!! How do you copy and paste settings to apply to other photos? Is this in iPhoto on a MacBook?