I am obsessed with Instagram. I just can’t get enough of the iPhone app. It’s so much fun to take pictures and add fun little filters and effects. I like how it’s also a mini-social network.
Well, I love the app so much that I didn’t want my favorite pictures trapped inside my iPhone for the rest of eternity. Don’t they deserve to see the light of day too?!?!?
I read in some magazine a while back about how you can turn your Instagram pictures into a miniature book. I thought that was cute, yes. But how realistic and practical is a tiny book? Eh, I’ll pass. Over break, though, I was reading all these websites with Instagram tips and tricks and stumbled on some cool resources. (For instance, cat Instagrams!)
And then when I spotted my next project:
Photostrips.
I have been obsessed with the charming quality of Photostrips for a long time. I even posted my favorite strips more than a year ago. Now, if it were up to me, I’d have one of the booths in the living room of my house. How. Cool. Would. That. Be.?
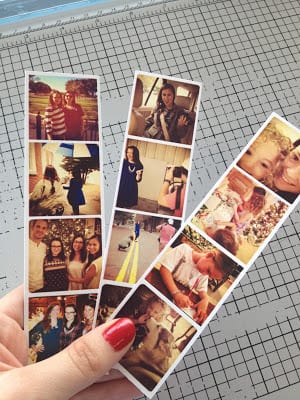
Well, you can turn your Instagrams (and, frankly, any pictures you have) into super cute and, more importantly, tangible photostrips.
Here’s how:
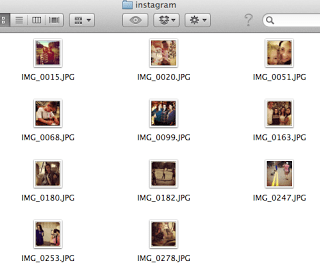
I first picked out which Instagrams I was going to use. I tried to make each strip have a “theme,” but I think that random ones would look cute too. I was planning on making three strips, with four pictures each. I made a folder on my desktop just so that I could get to it easier!
(I know, one is missing from the folder haha… not sure where it disappeared to!)
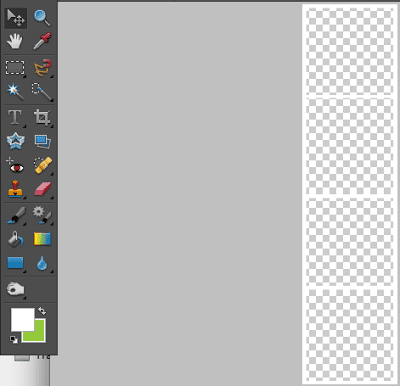
In Photoshop, I made a “template” for the Photostrip. I made the file 1.5 inches by 6 inches. Because not every Instagram used the same filter (and subsequently frame), I also went ahead and made skinny strips of white for the borders.
Can you see the white borders? I based the size off of one of the original Instagram frames. And just duplicated the shape so it maintained the same width.
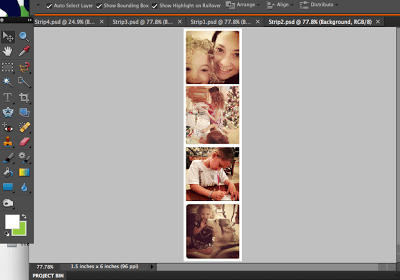
Once I had the template for the border, I just placed four of the Instagrams onto the file. I arranged each so it was under the border and in an interesting order.
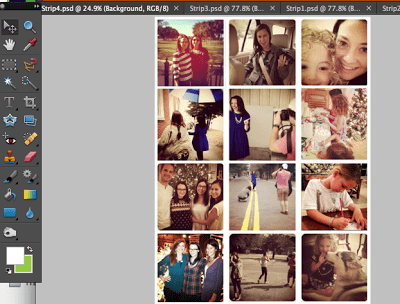
I repeated that process for the other strips and kept re-saving them. I would just delete the pictures from before, add the new ones, and then click Save As. Once all three strips were created, I made a new file. This time, I made it 4.5 inches by 6. I added all the other files into this one to I could be more efficient in the printing. (You can definitely fit a lot more than three strips per page… I just wasn’t sure how the project was going to turn out and thought three was a safe number. Print landscape and add as many as you wish!)
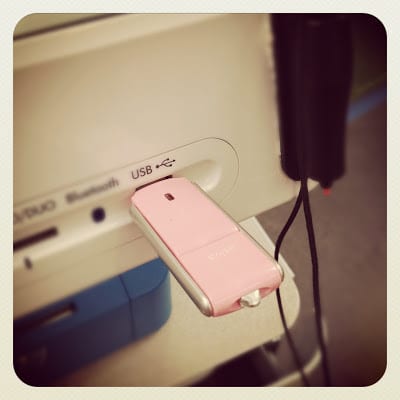
I saved this file as a JPG and took it to Kinkos to be printed. However, I recommend saving as a PDF so that you can print it with crop marks! I chose the glossy cardstock paper and simply printed on an 8.5 by 11 sheet.
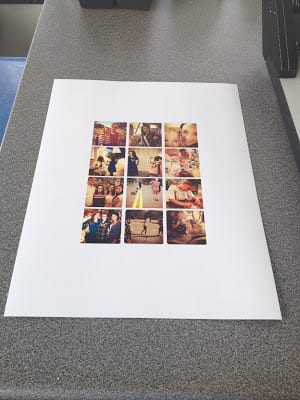
Here are the strips on one sheet. Now, I struggled because I wanted to make sure I left a proper sized border around the outsides. It was a little tricky and I was super OCD with the ruler.
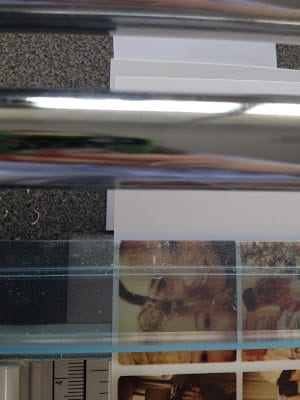
But then I realized that if I lined up the edge of the photo with the CLEAR finger protector thing, it would leave the absolute perfect border of white. I don’t know if you can see that in the picture, but it’s worth zooming in to see! (There is the edge of the plastic and then the edge of the metal. The gap between the two edges creates the border.)
The next step is to just cut right down the middle of the edges to separate the strips. Again, a little tricky, but just takes some patience and proper alignment!
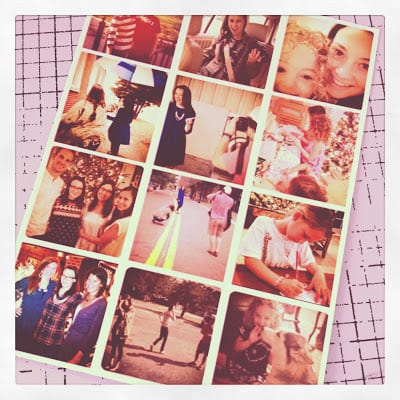
And there you go! Fun photostrips from your Instagrams!
What can you do with the photostrips?
Give away at parties
Use as bookmarks
Hang on the wall
Write love notes on the back
Make for presents
xoxo
Update:
This got quite the buzz going on Pinterest! Let me try to answer some of the questions that have come up:
You can use any picture, not just Instagrams! Crop the photo into a square and play around with filters in Photoshop so it has a vintage-y feel!
If pictures are blurry, you might not have a high enough DPI. Adjust the setting when you create a new file!
Be friendly with the Kinko’s people and you might get a discount 😉 Printing b&w is cheaper, and looks pretty cute and more traditional.
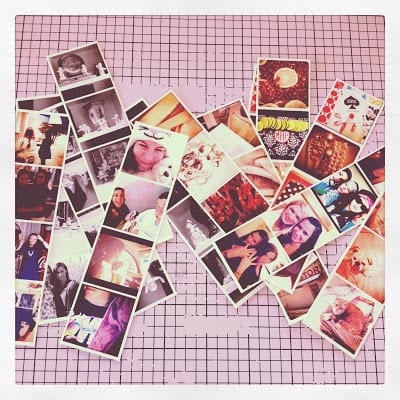
My sister, upon seeing the original photostrips, requested that I make her a bunch! Also shown, photostrips of our Snow Bunnies collection. We sent them as “thank yous” to our great aunts who send a few each Christmas.
I took all the Instagrams I had of books and made an official Book Book Mark 😉









Woah, that is so cool! Thanks so much for the tutorial, I can't wait to try it! I saw your photostrips and I was wondering how to do it.
xo,
http://peppermintandivy.blogspot.com/
These are SO fun! I love this idea and your tutorial is fab!
xo Josie
http://www.winksmilestyle.com
So neat! Thanks for sharing!
Oh my gosh, such a cute and creative idea! I'm always looking for a good bookmark!
xo,
E
I saw these on your Instagram the other day and I've been dying to see how you made them! This is such a fun DIY and I cannot wait to try it! Thanks, Carly 🙂
Great idea! I'll have to try it sometime.
too cute!!
Oh I love this so much! I have so many instagram photos that I would love to print! I'm going to have to try soon! First things first, getting photoshop for my Mac!
super cute idea. have you tried printing on a high quality ink jet?
super cute idea. have you tried printing on a high quality ink jet?
great idea!!! i love instagram and sometimes don't use it bc I didn't know how to do photostrips, so would use photobooth instead…but now I will use instagram more!!!
This is such an excellent idea and will be trying this stat! Thanks for the share
Great idea! Have used picFrame but will try in Photoshop.
Teresa
xoxo
Love the tutorial! So cute.
Love this! Is there any way you can post your Photostrip template?
definitely giving this a try! DITandO.com
Awesome!
What an amazing idea! SO cool! thanks for sharing
i love this so much! Thanks for going to the trouble of documenting the process for us!
xoxox,
Sandee
from katespade-aholic.com
I love this idea. Thank you for sharing! Gotta miss the photo strip machines. My daughter and I like to stop at the photo booths when we can find one. Just like my mother and me – always making the funny faces. 😉
this is so nice
I just found your tutorial on pinterest and it seriously just made my day!
I've already made several! Thanks!!
Love this idea! Thank you for the info!
By the way, where did you find this background? It is the same pattern as the fabric we used as a vignette backdrop for wedding pictures! Love it!
This is such a cute idea!! Love it! xx Krystal
http://www.krystalschlegel.com
I love this idea. Thanks for the tip. I'm a new follower.
Cinthya
http://www.eyeheart.ca/
THIS IS SO CUTE! i'm so excited to buy an iphone in a few weeks, especially for the instragram app, haha:)
That looks awesome! Could probably take it to a regular photo printer too… Printing multiple little squares would save on photo printing!
This was an awesome tutorial! I tried it out today and it looked fabulous!
thanks!
what strikes me is this. why do *you* have a lovely PINK thumb-drive and I have only a boring BLACK one???
🙂
bettye
http://onceisawadragonfly.blogspot.com
brilliant idea – i used to absolutely LOVE it when my friends and I used to go to the photobooths! We used to have such a laugh and loved being able to pass the photos around to other people – the mini prints are so cute! Thanks for sharing and reminding me of a fab idea that I'm about to try this second! X
Love this! Could you possibly include the Photoshop template?
Yes please!! any way you could include the template for us to use?! 🙂
– [email protected]
my photos are fuzzy 🙁
love. thank you!!!
How cute is that?! I'm making some right now!
What a great tutorial. I've featured this post on Craft Gossip here:
http://quilting.craftgossip.com/?p=14279
If you would like a "featured by" button, you can grab one here:
http://craftgossip.com/link-to-us/
Warmly,
Scarlett Burroughs
Quilting Editor, Craft Gossip
I made them this afternoon and they turned out adorably! My only issue is that the pictures ended up being a bit blurry, probably because they were shrunk to such a small size. how did you get the photos from instagram into your computer? I uploaded mine to my computer from my iphone and the images seemed a bit larger than an instagram photo (even though they had been downloaded from instagram) and ended up being 612×612 pixels, which is much larger than 1.5×1.5 inches.
Advice on how you got the images small without pixelating them?
Love this! And btw, you can have a photobooth in the palm of your hand. Incredibooth is for iPhone and I think it's got some connection to instagram. Have fun.
Cute idea. I too am obsessed with instagram. I'm planning on making a book with all our pictures of this year that we're living in Brazil.
Is there a way to do this if you don't have an iphone? Love this!
These look great. Have you seen our Postagram app? It allows you to print and ship your Instagram or cell phone photos as physical postcards for just $.99 each. Here's a link to the app http://postagramapp.com/
If you'd like some credits to play around with, you can email me at [email protected] and I'll set you up. Thanks!
I would really appreciate it if you could share your photoshop template. If I tried to make one I would probably end up throwing my computer out the window. And then how would I read your blog?
Here's a template I created 🙂
http://www.oliviamichele.co/downloads/FilmStrip.psd
– Olivia Apodaca
http://www.oliviamichele.co [coming soon]
Thank you, Olivia!
Olivia – the link is dead, could you maybe activate it again?? Thanks!!! 🙂
No Iphone so I will def. have to play around with my photo programs and see how this can be copied. No computer skills here but where there is a will there is a way and having the basis of reading your tut is a great start! Thank you!!
have you ever thought of making a preset for this? I agree with Lindsey above… I am not very good at photoshop and am about to throw my laptop!!!!!!
Thank you so much!
You are a lady and a scholar.
i love this, found it on pinterest, its my next "I can make that" too
what photoshop program do you use?
Would you consider doing a tutorial on how to make the template? I think it's adorable! Would you consider doing a tutorial on how to make the template?
And if you don't have photoshop is there no way to do this? 🙁 I love the idea soo much.
try paint.NET (at http://www.getpaint.net, appropriately enough) It's free, and it should be able to do this just fine. Photoshop might be a bit quicker, but such is life.
I shall try making the photoshop template but i feel like I will fail :/ Great idea though!
Quick question: I think I have the same version of photoshop as you do, but when I drop in the pictures, they are only black and white, even if they were in color…any ideas?
Sounds like you've got the mode set for grayscale. In the top menu bar, click on image, then mode, then RGB color.
Very cute idea! thanks for the tutorial.
Such a fun and great idea! I love photostrips and love instagram, so, this just works perfectly! Lovely blog too!
Liesl 🙂
I love this – too bad I don't have photoshop though.
I'm in love with Instagram and edited photos. These bring my back to childhood days of taking silly photos in photobooths. Thanks for sharing!
I wonder if you need to add the white borders? If you didn't add them, and just left a blank space between the photos, would the space between print out white or black? I *think* it would print out white anyway … though, black would look pretty good too …
this is such an adorable idea! i want to try it now 🙂
pandaphilia style
Can you email the template?
I am not goo with Photoshop and cannot figure out how to make the template.
Thanks!
[email protected]
Hi I was wondering if you could either post the file for the photoshop template or email it to me. [email protected]
You can do the same thing on picasa (free download from google) if you don't have photoshop. Just pick the pictures you want, make a collage, and print.
Um, I've not heard of Kinko's, and you made the whole Photoshop look butt-kickingly easy, and I don't have Photoshop (or Photoship, thanks spellchecker) but I appreciated the tutorial 😉
That is super cute.
Loving this so much that I featured it today in my Friday Features at http://www.liveteachcreate.com/ff511
thanks for the tutorial. just used it and made some photo strips for my son's graduation cards.
Thank you! It's my next too!!
That's an absolute fantastic idea! Thanks for sharing!
This is simply adorable!! I might have to try this sometime!
Could you also email me ([email protected]) the template? I stumbled upon this on pinterest and I think it is just adorable 🙂
Thank you!
what if you dont have photo shop!?
I'm kind of new to Photoshop. Could I make a template that is wall sized, save it to a jump drive then have Kinkos print it?
I love this!!!! Could you please send me a template???? I am pretty new to Photshop….
I wuold love to try it!!!
[email protected]
Thank you!
This is a great idea. I have Photoshop for 2 years and I still can't figure it out. For all you gals out there who need a photo program to do this try Photoscape — it's a free download that does not expire.
It's easy, but it takes a little time to get used to — but here's how to get a template — click on the tab that says "Combine" and on the right side column click on 'down' which will create a photostrip for you. You can add as many photos as you want.
To begin be sure you choose editor to find where your photos are 'living' and then just drag the photo you want to the center of the page, and continue on.
Hope this helps.
This idea is so cute! I made a photoshop template. I have not blogged before 🙂 but I created one so I could share. http://cammygoucher.blogspot.com/
how do you get photos off instagram?
Off topic…but your pic up at the top reminds me of Kris from Ghost Hunters International…
Adorable! Would you be willing to share your template? I have no idea how to make one. 🙁
This is a really cool idea but it's quite tedious so I made a program that will do this automatically! http://boothgram.com
thank got for you, I do not understand photoshop!
🙂
Bless you!
Seriously, you are awesome! That would have taken me all night to figure out and thanks to your program I am already printing great photostrips. Thanks!!
What if you have a PC and no photo shop? Can you still create the strips?
Will you share your photoshop file for the setup? Thank you!
[email protected]
Debbie
Will you share your photoshop file for the setup? Thank you!
[email protected]
Dessana
thanks a lot!
Hi! Can you please send me the template for the strips (at [email protected]) ? I've tried making it on my own, but no luck.
Thanks!
Will you share your photoshop file for the setup? Thank you!
Cara
[email protected]
This is such a great idea! Heading to Kinko's first thing in the morning!!!
im so sorry i tried to do the template on photoshop myself but ive never used photoshop before. could you send it to me please?? THANK YOU SO MUCH
[email protected]
Found via Martha Stewart Living's board. Very cute! Cute blog too.
Any one have a template? Would love to try this but am horrible at photo shop!! [email protected]
Love this idea. It would be wonderful if you were willing to share your template! Pretty pretty please?
I would love to do this for my sons first birthday! Are you able to share the template?
[email protected]
Try Copygr.am
This is such a neat idea! I 'm new to photoshop, could someone share the template please?
Hahaha HASLAMS! I've been going there since I was a kid!
I am always trying to think of fun ideas for all these Instagram pictures. Thanks for sharing this fantastic idea and tutorial. I'll be sharing with my FB fans….
wait what how did you make the border strips again?
I love this idea, I do not have instagram but think I will try this with my other photos.
So fun! I just created a Photoshop template available for (free) download on my blog!
http://babyblakely.blogspot.com/2013/02/instagram-photostrips.html
Thanks for the great idea!
http://craftsparklepop.blogspot.com/2013/03/pinterest-project-photo-strips.html
I love this!
I don't have photoshop, but I used Boothgram.com ..its so easy!!
Great Tutorial, I found it on Pinterest!
http://disenoreciclado.wordpress.com/
Hi dude, Cute blog you have posted here. I would like to thank you for the efforts you've got produced in writing this article.
get more instagram followers
So fun!Im confusing with making photo template, maybe you can post tutorial for it. I would love if you want to send the template to [email protected] thank u so much!
Well, I love the app so much that I didn't want my favorite pictures trapped inside my iPhone for the rest of eternity. Don't they deserve to see the light of day too?!?!? buy real active instagram followers
couldnt figure out how to make the template 🙁 i have photoshop but i suck at it lol. i really wish i could make this!
If you want the tutorial on how to make the template follow this link and scroll to the middle of the page- a lady has posted a video and it was very very helpful. It was so helpful that I was able to make my photostrips without using photoshop (used a rip-off version) and without using instragram photos (cropped my own pics from my digital camera on my computer into squares).
Hope this helps!
http://dagsmith.squidoo.com/photostrip
Hi dude, Cute blog you have posted here.
Fat Loss Factor
nice & cool, love it …. mobil sedan corolla
This is more than wonderful !!! Thank You
What a fun idea to make them into bookmarks!
This is exactly what I was looking for – going off to uni in September and I knew I'd be homesick and wanted some cute instareminders! Thank you so much for this!
woooooooooooooooooooow ilove itشركة تنظيف منازل بالدمام
نقل عفش بجدة
شركه نقل اثاث بمكة
شركة نقل اثاث بالدمام
شركة تنظيف منازل بالمدينة المنورة
شركات عزل مائي
شركة مكافحة حشرات جدة
تنظيف فلل بالدمام
شركات مكافحة الحشرات فى الرياض
افضل شركة تنظيف بالخرج
here
here
here
here
here
Its such an amazing post, I really like it.
Harga Mobil Murah Bandung
Harga Mobil Murah Chevrolet
Harga Mobil Murah Daihatsu
Harga Mobil Murah Honda
Harga Mobil Murah Suzuki
Harga Mobil Murah Mitsubishi
Harga Mobil Murah Mazda
Harga Mobil Murah Ford
Harga Mobil Murah Kia
Harga Mobil Murah Toyota
Harga Mobil Murah Nissan
Wow this is a great post and Such a nice information you shared in this article, I like it.
Mobil Murah Chevrolet
Harga Mobil Daihatsu
Mobil baru Honda
Harga Mobil Suzuki
Mobil baru Mitsubishi
Harga Mobil Mazda
Mobil Ford
Harga Kia Bandung
Mobil baru Toyota
Harga Mobil Nissan
Fantastic Post, I realy like it.
Harga Mobil Toyota
Mobil Murah Chevrolet
Harga Mobil Baru kia
Harga Murah Mobil Ford
Harga Mobil Honda
Harga Mobil Mazda
Harga Murah Nissan
Harga Mobil Baru Daihatsu
Harga Mobil Mitsubishi
Harga Murah Mobil Suzuki
Harga Murah Honda Mobilio
penlr
penlr.com